TL;DR: Run avahi on the VM, ssh to the VM name dot local.
Many of the Simple C++ Projects I work on, whether I use Xcode or not, land up needing to be recompiled on a Linux Virtual Machine prior to being deployed to the production Linux server. I do this because I want to be sure the I know what needs to be set up in the Linux environment, that the compile succeeds without errors in a production-like environment and the code works properly before deploying.
I spin up these virtual machines all the time. But connecting to them to copy the code over and perform these compiles is a hassle because their IP addresses change all the time. Aside: Setting a static IP address does not work because I often clone these virtual machines to try different settings requiring a new IP address to be set up and remembered manually. Also, static IP addresses sometimes conflict on different networks.
But there is a solution. avahi.
The Problem in Detail
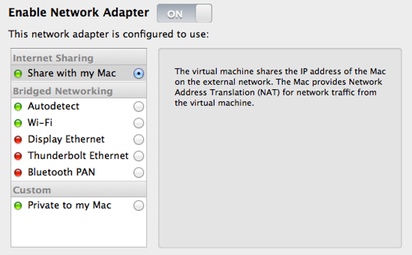
I spin up Linux VM’s in my local VMware Fusion using the exact same Linux distribution as production. Since these are never to be exposed to the wide world out there, I set the network to “Share with my MAC” which makes it a local VM. I could use “Bridged Networking” but this problem then recurs when I work from home or a coffee shop.
I yum install all the packages as per production, even set up a deploy user. I then need to ssh into that deploy user on that VM as if I were ssh-ing into production to build and test the code.
The problem is that each time the Linux VM boots, or I use it outside the office, it gets a new DHCP IP address. Which means that I need to find out what the IP address is every time before I can SSH in. Too many steps:
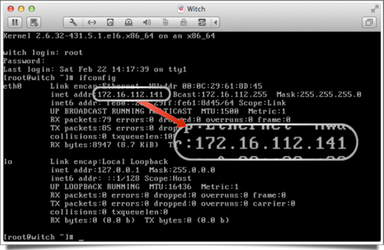
- Log in
- Run an
ifconfig - Find the IP address (172.16.112.141 this time)
- Press
⌃⌘to release the mouse - Open a terminal locally
ssh deploy@172.16.112.141this time!
What a Pain! Next time I use this VM, I’ll have to perform the same dance.
The Solution in Detail
Run avahi on the VM.
When you build the Linux VM (I use CentOS 6), first set the host name to a unique name. Edit /etc/sysconfig/network as root and set the HOSTNAME attribute:
NETWORKING=yes
HOSTNAME=witch.noverse.local
You may need to restart some distributions after doing this.
Then execute the following commands as root to install avahi
$ yum -y install avahi
...
$ service avahi-daemon start
...
$ chkconfig avahi-daemon on
This installs the avahi daemon, starts it and sets it to start on every reboot.
What the avahi daemon does is publishes the VM’s basename (the first part of the hostname before the dot) on the ZeroConf (or to use Apple’s word Bonjour) network.
Which means you can always see it as basename.local. So, instead of ssh-ing to an new IP address every time, just ssh to the basename and add a .local. For example, this works for the above Linux VM:
ssh deploy@witch.local
Then, no matter where you are or what IP address the VM gets, you can always access it by the same name. You can even add this to your .ssh/config file as a shortcut, which never changes!
I have been totally surprised how much fiddling and time this simple trick has saved me.
Follow the author as @hiltmon on Twitter. Mute