TL;DR: You can use ChronoSync to access a remote ChronoAgent if Back to My Mac is turned on for both computers. Which means you can sync from anywhere!
I have been using the excellent ChronoSync for years to ensure that the Documents and Projects folders on my personal laptop are kept in sync, and therefore backed up, with my home OS X server.
These days I have two laptops, the personal one that lives at home and is used for Noverse work, and the work one for my day job at the fund. But sometimes when a Noverse Client calls, I’m at the office and do not have access to my personal laptop which contains their software and files.
When this happens, I use Back to My Mac to access my home server, download their files, do the work, and then manually upload them back (see below how to do this, it’s pretty easy).
But it takes time, time away from real work to do this upload and download every time. It would be better for them – and me – if my Noverse files were also kept in sync on my work laptop. And it would be even better if I could do this when not at home.
So a few days ago, I brought the work laptop home and set up ChronoSync on my work laptop. The plan was to sync at home in the evenings and if any Noverse work needed to be done, I’d have close-to-the-latest files to work with.
I started to enable the sync of Documents and Projects folder on the server to a Noverse sub-folder … and stumbled across an interesting feature. Since I use ChronoAgent on my server to speed up syncs, it turns out that the work laptop “saw” the server ChronoAgent both on the LAN and on Back to My Mac. Which means it can sync from anywhere!
How cool is this.
Here is how to set it up.
Note: You do need ChronoAgent set up on the destination computer for this to work!.
In ChronoSync, go to Preferences and choose the Connections tab. While on the home LAN, click Add:
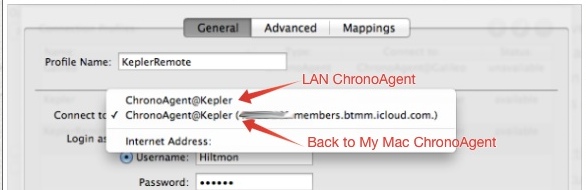
As you can see, there are two references for Kepler (the name of my home server):
ChronoAgent@Kepler, the usual LAN ChronoAgent, and- Another
ChronoAgent@KeplerwithXXXXXXX.members.btmm.icloud.comas its domain. That’s the Back to My Mac one. I set this up as a new connection calledKeplerRemote.
Then in the sync documents, I simply used the new KeplerRemote agent connection instead of the regular Kepler agent connection:
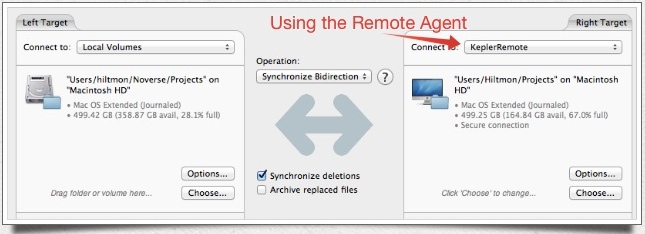
Now I can sit at the office, or in a coffee shop, and use ChronoSync to sync files between my work or home laptop and the home server via Back to My Mac! No more wasting time downloading and uploading when a client calls!
Top Tip: Use ChronoSync’s built-in scheduler to schedule these syncs regularly and you can forget about worrying whether you have the latest files again.
Aside: Finding your Back to my Mac ID
In order to use this, you will need a home Mac that remains turned on with:

- Back to My Mac enabled on the home computer. Make sure System Preferences / iCloud has Back to My Mac checked and that there are no warnings.
- Both computers (home and laptop) are signed in to the same iCloud account.
- You also need Back to My Mac enabled on the laptop.
ChronoSync automatically finds the Back to My Mac address for you. But if you just want to ssh in or mount your shared folder remotely, you will need your unique iCloud URL. To find out what your unique address is, open up the Terminal.app and type
$ dns-sd -E
You should get something like this:
DATE: ---Thu 15 Aug 2013---
23:22:04.315  ...STARTING...
Timestamp     Recommended Registration domain
23:22:04.315  Added     (More)               local
23:22:04.316  Added                          icloud.com
                                             - > btmm
												- - > members
												- - - > XXXXXXXXX
Where XXXXXXXX is your unique ID.
Your home computer name is then:
<computer name>.XXXXXXXXX.members.btmm.icloud.com
To mount a drive, launch Finder and press ⌘K to bring up the Connect to Server dialog and type in your computer’s URL. Note that you must have File Sharing checked in System Preferences / Sharing on the remote computer for this to work.
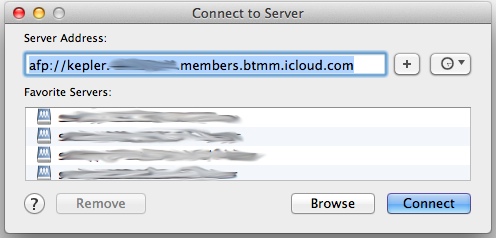
Click Connect to see your shares at home.
For ssh, make sure the home computer has Remote Login enabled and the command is:
# ssh user@<computer name>.XXXXXXXXX.members.btmm.icloud.com
Happy remoting.
Follow the author as @hiltmon on Twitter. Mute