
I have been using TextMate for years as my primary programmer’s editor, but it turns out that I only use a subset of its amazing features. I’ve been speaking with users of other awesome programmer’s editors and they wanted to know what it is in TextMate that I love so much and keeps me using it.
So here are the basic parts of TextMate 2 that I use regularly. Maybe you can divine some tips from it.
Note that it all starts with the fact that TextMate 2 is the most Mac-like of programmer’s editors. It uses all of the standard Apple keystrokes and text features so that I do not have to know another set. I’ll assume you know the platform keys and features and move on to the TextMate features straight away.
Bundles
The true power of TextMate can be found in its bundles. Whether you code in Ruby and Shell like I do, or in some esoteric language, chances are that there is a bundle that will not only provide syntax highlighting for that language but include a whole bunch of snippets to make programming easier. There are bundles for programming languages, build systems, source code control, testing languages and odd file formats. Even the themes are bundles.
I don’t install all the bundles, I only install them as needed (and remove the ones I do not need). In the good old days when TextMate 1 was still growing, this prevented keystroke and scope conflicts.
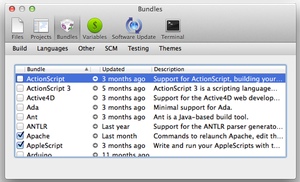
To install a language or feature bundle, open Preferences… or press ⌘, and click on Bundles. Check a bundle to install, uncheck to remove. Or just open an unrecognized file and TextMate 2 will recommend a bundle to install.
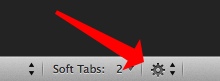
There are many ways to learn about what’s in a bundle. You could go to the Bundle / Edit Bundles… menu (or press ⌃⌥⌘B) and then click on a bundle to see its contents. Or you could click on the gear menu (see image right) at the bottom of an opened file to see what’s available.
Or best of all, use ⌘⌃T to bring up the bundle search dialog to find what’s there. Type in what you think could exist or what it may be called, and chances are, there it is. That is how I found the available snippets and keystrokes that I use every day.
Default file
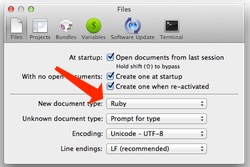
⌘N is a programmer’s friend, it creates a new file in any editor. In TextMate 2, the shipped default is a plain text file which really makes no sense in a programmer’s editor. I set it to my most common format, Ruby, as most of the time, that’s what I need. To set the default file type, open Preferences… and on the Files tab, set your preferred new document type.
Favorites
I find myself opening the same projects over and over again in TextMate 2. In TextMate 1 we had project files, but I never really used them. So I used to open projects by opening a terminal, cd to the project folder and type the command mate . to open the project folder (and then created TextExpander scripts to do this, see TextExpander in Terminal).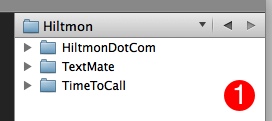
In TextMate 2, the Favorites feature works better for me. To set up a favorite, use the file browser in TextMate 2 to navigate to the folder above your projects.
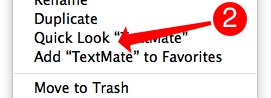
Then, to create a favorite, right click on the project folder and choose “Add <folder> to Favorites”.
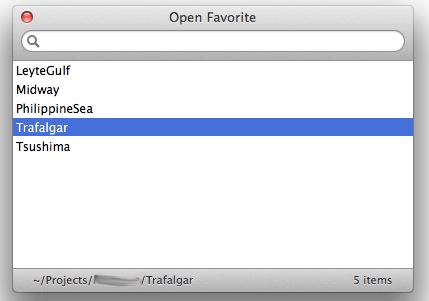
Next time you want to open an project, just press ⇧⌘O (O not zero) to open the Open Favorite dialog, then type or click to open the project. I just love this. Note that in the current alphas of TextMate 2, you need to restart the application for the favorites to be updated.
mate and rmate
Since I spend most of my day in the shell, I use the mate command a lot to open and edit files in TextMate 2. To install the mate command, open Preferences…, click on the Terminal tab and click install. Then you can just type mate <filename> to open a file for editing from anywhere.
I also ssh to a lot of virtual servers to edit and maintain them. vi works great for simple edits, but I use rmate from these remote machines to launch TextMate 2 on my computer to perform more complex edits.
To set up rmate on the server, ssh into the server and use sudo if necessary. Type in the following commands to download the script and enable it’s execution:
curl -Lo /usr/local/bin/rmate https://raw.github.com/textmate/rmate/master/bin/rmate
chmod a+x /usr/local/bin/rmate
You also need to create a reverse tunnel when you ssh for rmate to work. In your ~/.ssh/config file, create an entry for each remote server as follows:
Host nimitz
	User hiltmon
	HostName 192.168.xx.xxx
	RemoteForward 52698 localhost:52698
You can now ssh to that server and use rmate to edit in TextMate 2. For example:
**local** $ ssh nimitz
**nimitz** $ rmate .bash_profile
will open the .bash_profile file from the remote server in your local TextMate 2.
Muscle memory keys
As a Mac user, I already have the Mac editing keys in my muscle memory. Here are some additional keys that I use all the time in TextMate 2 to maximize my productivity:
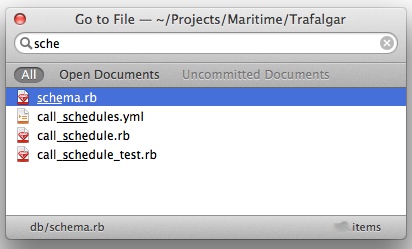
⌘Tis my favorite key, it brings up the Go to File dialog which allows you to type a few letters and TextMate 2 intelligently finds all matching files in the project for you. Common uses are for opening theroutes.rbfile (⌘T rou ↩) or theschema.rbfile (⌘T sch ↩) in Rails projects.
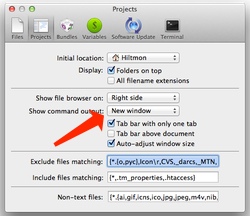
⌘Rruns the current file. I do not like the default where the results are displayed at the bottom of the editor window, so I change it to New window in the Preferences, Projects tab.⇧⌃Dduplicates a line (or the current selection). I use this a lot to duplicate code patterns and then change the parameters. For example, when writing code from a CSV import to add to an ActiveRecord such as
Security.create!(
	cusip: row[0],
	isin: row[1]
I’ll often duplicate the last line to create
Security.create!(
	cusip: row[0],
	isin: row[1]
	isin: row[1]
	isin: row[1]
	isin: row[1]
	isin: row[1]
	isin: row[1]
And then use the below keys to navigate quickly around the duplicates to change the labels and indices.
⌥→moves to the next word (add⇧to select) and⌘→moves to the end of a line which is the standard Mac way. So without learning anything new, I can move the caret (cursor to some) around the file a lot quicker. But TextMate 2 goes further, if you do not have it mapped in Mission Control,⌃→moves to the next part in a CamelCase word (I do not use this).⌥←moves to the previous word (add⇧to select) and⌘←moves to the beginning of a line.⌘↩creates a new line from anywhere in the line which saves moving to the end to do so, especially since TextMate auto-inserts closing braces and quotes for you to the right of your caret.⌘]indents the current line. TextMate 2 usually does this for you when typing, but does not always clean up when deleting.⌘[un-indents the current line.⌘/comments out a line, or uncomments it if commented out. I use this a lot to activate debug print statements in code when testing and then deactivate them after the bug is found. Select multiple lines to comment out blocks with this keystroke.⇧⌘]navigates to the next open tab, useful when working between views, controllers and helpers. Interestingly, the Ruby bundle does have macros to switch between these, but I don’t use them either.⇧⌘[navigates to the previous open tab
Column mode
I use column mode a lot in TextMate 2, especially when working with SQL fields. In TextMate 1 this was a real column mode where everything had to be squared up, but in TextMate 2, it really means having multiple carets.
Multiple carets are awesome, you can make the same changes all over the document with a few keystrokes. Once you get used to having and using multiple carets, you really feel the power of TextMate 2.
For example, lets say I have the following CREATE TABLE command from SQL Server:
CREATE TABLE Securities(
cusip varchar(9),
isin varchar(13),
name varchar(255),
...
And want to change it to an inline cusip, isin, name for use in an INSERT statement, I can do the following using multiple carets:
- Select to where I want the carets to be with the selection start being the first location and the selection end being the last.
- Tap the
⌥key to switch to multiple carets. ⌥→to move to the end of the field name, then⇧⌘→to select to the end of the line.
DELETEto remove the excess baggage.→once to cross over the newline,DELETEto remove the new line.- Type a comma to separate the elements,
⇧→to highlight the excess spaces,SPACEto replace them and finally⌘⇧Lto select the line.
And now I have what I need to paste into the INSERT statement. Its a lot easier than typing out all the fields, especially for large tables.
Searching
As with all editors, TextMate has full search and replace functionality. For me, I use the in-file search and replace a lot, as well as the find in project features, so much so that I have memorized those keystrokes as well.
For searching and navigating within a file, I usually start with a ⌘E to use the current selection for a find. ⌘G then finds and moves the selection to the next occurrence of that text in the file. ⇧⌘G finds the previous occurrence. This is great for finding where a function is used in a file. Select the function name, ⌘E to set it up for search, then ⌘G again and again to see where its used.
I also use this to make fast replacements. Use ⌘E to set the selection to search. Then replace the selection with the new text. Select that and press ⇧⌘E to tell TextMate that the new selection is the replacement text. If you are brave, press ⌃⌘G and all occurrences of the original text are replaced with the replacement text in the file. Very sweet.
If you do not have a selection to start with, ⌘F is your friend. Press ⌘F to open the Find dialog, type in the search phrase and press return to start searching. You can then use ⌘G and ⇧⌘G to find next and previous.
And to search across all files in a project, ⇧⌘F brings up the Find dialog scoped to all files in the project.
Cool tip: If you have already created a selection to find in a file using ⌘E or a replacement using ⇧⌘E, that will be used in ⌘F (Find in file) or ⇧⌘F (Find in project) as well.
HTML and ERB
The final set of keystrokes I’d like to share with you today are used to create HTML or ERB tags, and I use these a lot too.
⌃⇧, (⌃<) creates a new HTML tag and selects the tag name. Just type to change the start and end tag. So press ⌃⇧, to create a <p></p> tag and then type div to create a <div></div> tag. TextMate 2 also stops copying the tag name to the end tag on space.
For ERB tags, use ⌃⇧. (⌃>) to create a new <%= | %> tag with the cursor where the pipe is. Press it again to change the tag to <% | %>, again to get <%- -%> and again for <%# %> and again to cycle back. That is far faster than typing the whole thing.
Fin
So those the basic TextMate 2 features that I use all the time, its only just over 20 keystrokes to get used to using.
I am quite certain that you can do all of the above in your programmer’s editor of choice just as efficiently. But for me, it’s the Mac basics and TextMate features and keystroke muscle memory that makes me so productive in TextMate 2.
Update: I have written a follow-up post with even More TextMate 2 Basics. Check it out.
If you have any awesome TextMate 2 features or keys you cannot live without, please share them in the comments.
Follow the author as @hiltmon on Twitter and @hiltmon on App.Net. Mute #xpost on one.